
Chevy Silverado Heater Not Working? Step-by-Step Diagnostic & Fix Guide
Is your Chevy Silverado heater not working, leaving you shivering in your cab? When a Silverado blows cold air despite the heat being turned on, the issue is typically caused by a faulty blend door actuator, a clogged heater core, low coolant levels, or a stuck thermostat.
In most cases, a simple diagnostic sequence can pinpoint the exact failure point, saving you hundreds of dollars in unnecessary parts replacement.
Key Takeaways
- A clicking noise behind the dashboard or air blowing cold on only one side of a dual-zone climate system strongly indicates a failing blend door actuator.
- If both heater hoses under the hood are not hot to the touch, your heater core is likely clogged or air-bound, preventing hot coolant from circulating.
- Many Silverado blend door issues can be resolved without tools by performing a simple HVAC control module recalibration fuse-pull reset.
- Using non-compatible coolant or neglecting Dex-Cool fluid changes is the leading cause of premature heater core clogging in GMT800 and GMT900 models.
Why is my Chevy Silverado blowing cold air when the heat is on?
Your Chevy Silverado blows cold air when the heat is on because hot engine coolant is not reaching the heater core, or a broken blend door actuator is blocking hot air from entering the cabin.
To fix this, you must determine if the issue is a thermal delivery failure (like low coolant, a stuck thermostat, or a clogged heater core) or an airflow routing failure (a broken blend door actuator).
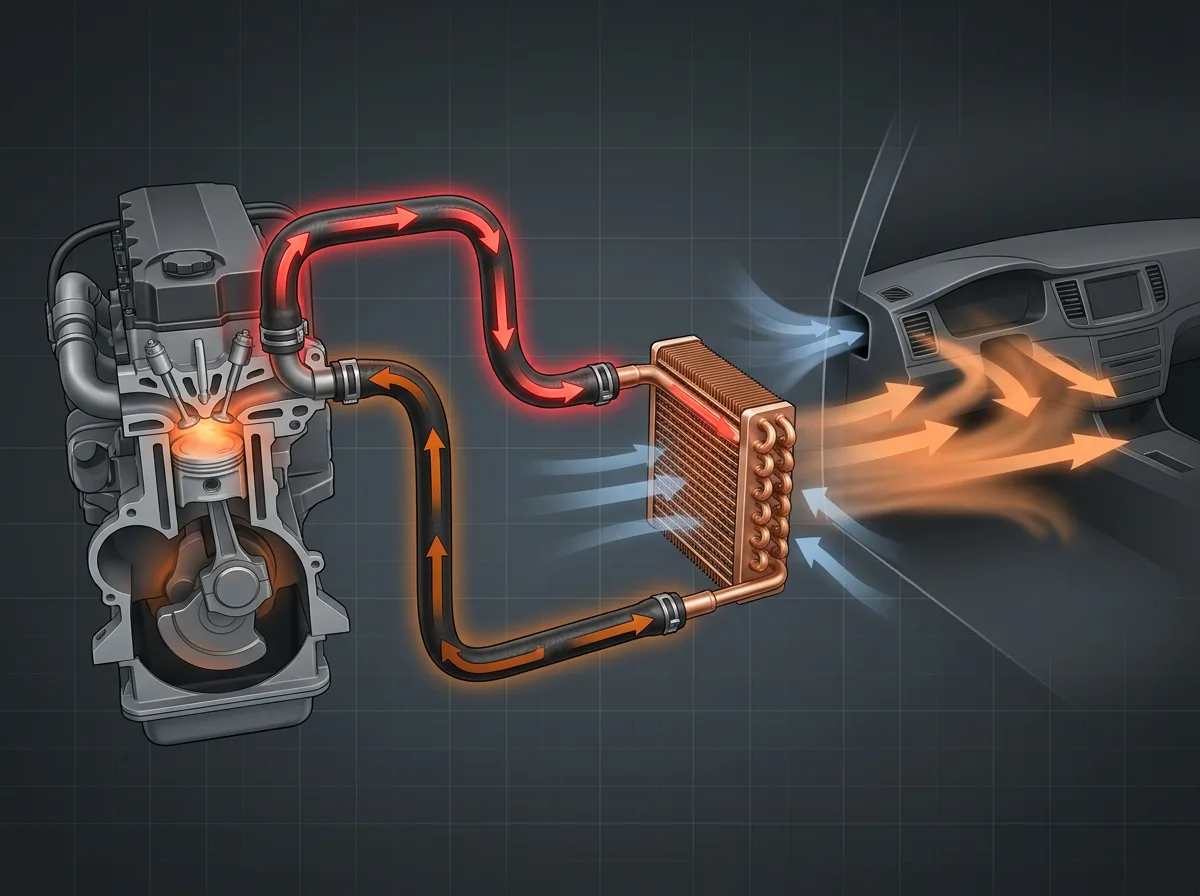
To understand why your heater fails, it helps to look at how the Silverado heating system works. Your truck’s cabin heater relies on hot engine coolant diverted from the engine block into the heater core, which acts like a miniature radiator behind your dashboard.
A blower motor pushes cabin air across this hot core, warming the air before it exits your vents.
Four primary failure points can disrupt this process and leave you shivering in your cab:
- Low Coolant or Air Pockets: If your coolant level drops, an air pocket can form at the highest point of the cooling system—often the heater core. Without hot liquid circulating through the core, the blower motor only pushes cold ambient air into the cabin.
- Stuck-Open Thermostat: If your engine temperature gauge stays unusually low after driving for 15 minutes, your thermostat is likely stuck open. This prevents the engine coolant from reaching the optimal operating temperature needed to generate hot cabin air.
- Clogged Heater Core: General Motors vehicles using Dex-Cool require strict maintenance. According to GM Technical Service Bulletins on Cooling Systems (2025), if Dex-Cool is neglected or mixed with air or non-compatible coolant types, it degrades and forms a muddy sludge that directly clogs the narrow passages of the Silverado heater core.
- Broken Blend Door Actuator: This small electric motor controls the physical door that mixes hot and cold air. According to General GM HVAC Diagnostic Guidelines (2026), a faulty blend door actuator is the most frequent culprit for single-side or total heat loss in 1999-2014 Chevy Silverados, often triggered by stripped plastic gears inside the actuator motor.
Dual-zone climate control systems are particularly prone to these actuator failures. If your Silverado blows hot air on the passenger side but freezing air on the driver’s side, a failed driver-side blend door actuator is almost certainly the cause.
The dual-zone system uses separate actuators for each side, and when the internal plastic gears strip, the door gets permanently stuck on the cold setting.
How to diagnose a Silverado heating system step-by-step
To diagnose a Chevy Silverado heater that is not working, you must systematically isolate whether the issue is thermodynamic (coolant flow and temperature) or mechanical (air distribution and blend doors).
You can pinpoint the exact cause of your truck’s cold air by following a four-step diagnostic process before spending money on unnecessary replacement parts.
Step 1: Inspect the Coolant Level and Quality
Start by checking the engine coolant level in the pressurized surge tank under the hood. The engine must be completely cool before you open this cap.
The coolant should reach the “Cold Fill” line and consist of clean, orange Dex-Cool fluid. According to GM Technical Service Bulletins on Cooling Systems (2025), neglected Dex-Cool, or Dex-Cool mixed with air or non-compatible coolant types, can degrade and form a muddy sludge that directly clogs the narrow passages of the Silverado heater core.
If the fluid looks brown, muddy, or is dangerously low, a system flush is your first priority.
Step 2: Monitor the Engine Temperature Gauge
Start your Silverado and let it idle or drive it for 10 to 15 minutes while watching the temperature gauge on your instrument cluster. A properly functioning thermostat should allow the engine to reach its normal operating temperature, which is right around 210°F for most Silverado model years.
If your dashboard gauge struggles to climb past 160°F, or if it takes an unusually long time to warm up, your thermostat is likely stuck open. This prevents the coolant from ever getting hot enough to warm your cabin.
Step 3: Perform the Heater Hose Touch Test
Locate the two heater hoses running from the engine bay through the firewall on the passenger side. Carefully touch both hoses once the engine has reached operating temperature.
Both hoses should feel hot to the touch. If one hose is hot and the other is cold or lukewarm, coolant is not flowing through your heater core.
This temperature differential confirms a physical blockage inside the core itself. If you must replace the core, prepare for a major job.
According to Automotive Labor Guide Estimates (2026), replacing a Chevy Silverado heater core typically requires removing the entire dashboard assembly, resulting in 6 to 8 hours of labor and professional repair costs ranging from $800 to $1,500.
Step 4: Listen for Blend Door Actuator Noises
Turn your ignition to the “On” position without starting the engine, turn the radio off, and cycle your temperature settings from full cold to full hot. Listen closely behind your glovebox and center console.
If you hear a distinct clicking, tapping, or whirring noise, your blend door actuator is failing. According to General GM HVAC Diagnostic Guidelines (2026), a faulty blend door actuator is the most frequent culprit for single-side or total heat loss in 1999-2014 Chevy Silverados, often triggered by stripped plastic gears inside the actuator motor.
| Symptom | Likely Failed Component | Required Action |
|---|---|---|
| Clicking or tapping noise behind the glovebox / cold air on one side | Blend Door Actuator | Replace the affected blend door actuator and recalibrate the HVAC system. |
| Engine temp gauge stays below 160°F after 15 minutes of driving | Thermostat (Stuck Open) | Replace the engine thermostat and top off the coolant. |
| One hot heater hose and one cold heater hose at the firewall | Clogged Heater Core | Attempt to back-flush the heater core; replace the core if flushing fails. |
| Low coolant level in surge tank / sweet smell inside cabin | Coolant Leak (Hose, Water Pump, or Core) | Pressure test the cooling system, repair the leak, and refill with fresh Dex-Cool. |
Is it a bad blend door actuator or a clogged heater core?
When your Silverado’s cabin stays freezing cold despite cranking the temperature settings, the culprit is almost always one of two components: a failing blend door actuator or a clogged heater core.
Because both issues result in a lack of heat, they are frequently confused. However, each has a distinct set of symptoms and diagnostic procedures that will help you pinpoint the exact failure.
Symptoms of a Bad Blend Door Actuator
The blend door actuator is a small electric motor that physically turns the plastic doors inside your HVAC plenum to mix hot and cold air. When it fails, the system cannot direct air across the heater core.
- Repetitive Clicking or Ticking Sounds: This is the most common early warning sign. When the plastic gears inside the actuator strip or break, they will slip as the motor tries to turn. You will hear a rapid clicking, knocking, or tapping sound coming from behind the glovebox or center console, especially right after you turn the key or adjust the temperature.
- Erratic Temperature Swings: If the actuator is failing but not completely dead, it may lose its calibration. You might get blasting heat for ten minutes, only for the system to suddenly switch to ice-cold air without you touching the dial.
- Split-Side Temperature Differences (Dual-Zone Climate Control): If your Silverado is equipped with dual-zone climate control, it uses separate actuators for the driver and passenger sides. If the passenger side blows hot air but the driver’s side blows freezing cold (or vice versa), a failed blend door actuator on the cold side is almost certainly to blame.
Symptoms of a Clogged Heater Core
The heater core is a small radiator located behind your dashboard. Hot engine coolant flows through it, and your blower motor pushes air across its fins to heat the cabin. Over time, rust, scale, and degraded coolant can clog its narrow passages.
- Lukewarm Air at Idle that Warms Up When Revving: This is the classic signature of a partially clogged heater core. At idle, your engine’s water pump spins slowly and lacks the pressure to force coolant through the restricted, clogged passages of the heater core, resulting in cold air. When you rev the engine or drive at highway speeds, the increased water pump pressure forces just enough hot coolant through the clog to temporarily deliver lukewarm or warm air.
- Cold or Unevenly Heated Heater Hoses: Locate the two rubber heater hoses running from the engine bay through the firewall to the heater core. With the engine fully warmed up and the heater running on high, carefully feel both hoses.
- Normal Operation: Both hoses should be hot to the touch (one slightly cooler than the inlet, but still very hot).
- Clogged Core: The inlet hose will be hot, but the outlet hose will be noticeably cooler or cold, indicating that coolant is entering the core but cannot flow through it to return to the engine.
How to Diagnose Using an OBD2 Scanner (Live HVAC Data)
Instead of tearing your dashboard apart to inspect these parts, you can use technology to get a definitive answer. A standard OBD2 code reader won’t always cut it; you will need a mid-tier or professional-grade scanner capable of reading Body Control Module (BCM) or HVAC live data.
- Connect the Scanner: Plug your OBD2 scanner into the port beneath the driver-side dashboard, turn the truck’s ignition to “ON” (engine running is preferred to monitor voltage), and navigate to the HVAC (Heating, Ventilation, and Air Conditioning) Module.
- Select Live Data PIDs: Look for the live data parameters (PIDs) related to the blend doors. You want to select:
- Left/Driver Blend Door Commanded Position (%)
- Left/Driver Blend Door Actual Position (%)
- (Repeat for the Right/Passenger side if equipped with dual-zone)
- Perform the Test: While watching the live data screen, slowly turn your temperature dial from full cold (0%) to full hot (100%).
- Analyze the Results:
- Healthy Actuator: The “Actual Position” value should smoothly mirror the “Commanded Position” value in real-time. If you command 50%, the actual position should quickly move to and stop at 50%.
- Bad Actuator: If the commanded position changes (e.g., from 0% to 100%) but the actual position stays stuck at 0%, fluctuates wildly, or shows an “Out of Range” error, the actuator motor is dead or stripped.
- Clogged Heater Core Indicator: If the scanner shows that the actuator is successfully reaching 100% hot (actual matches commanded) but you are still getting cold air, the blend door is physically opening. This confirms the issue is thermodynamic rather than mechanical, pointing directly to a clogged heater core.
How do you reset the blend door actuator on a Chevy Silverado?
You can reset the blend door actuator on a Chevy Silverado by pulling the HVAC fuse, cycling the ignition, and letting the climate control module auto-calibrate the door’s limits.
For older Silverado models, disconnecting the negative battery cable for 10 minutes accomplishes the same reset.
These electric actuators use small internal motors to turn the blend doors, controlling how much hot or cold air enters the cabin. Over time, battery replacements, voltage drops, or minor system glitches can cause the HVAC control module to lose track of the actuator’s physical limits.
When this calibration is lost, the system may blow cold air on one side and hot air on the other, or stop blowing hot air altogether. In 1999-2014 Chevy Silverados, a faulty blend door actuator is the most frequent culprit for single-side or total heat loss, often triggered by stripped plastic gears inside the actuator motor.
The Fuse-Pull Recalibration Method
For most modern Chevy Silverados, pulling the HVAC fuse forces the climate control module to perform a self-diagnostic sweep. Follow these steps to trigger the reset:
- Turn off the vehicle and remove the key from the ignition.
- Locate the fuse panel inside the cabin (typically on the driver’s side edge of the dashboard) or under the hood.
- Remove the HVAC fuse. Look for the fuse labeled “HVAC,” “HVAC 1,” or “HVAC/ECAS” (refer to your owner’s manual for the exact location).
- Wait 60 seconds to ensure the module completely loses its memory backup power.
- Reinstall the fuse and insert the key into the ignition.
- Turn the key to the “On” position (do not start the engine).
- Wait 2 minutes without touching any climate control buttons, knobs, or dials. You will hear the blend doors clicking and whirring as they sweep from one limit to the other to recalibrate.
The Manual Battery-Disconnect Method
If your older Silverado does not respond to the fuse-pull method, you can perform a hard reset by disconnecting the truck’s battery.
First, disconnect the negative battery cable using a 10mm wrench. Leave the cable disconnected for roughly 10 minutes to drain all residual power from the vehicle’s onboard computers. Reconnect the cable, tighten it securely, and turn the ignition key to the “On” position.
Just like the fuse-pull method, you must let the truck sit with the ignition on for 2 full minutes. Do not touch the radio, the A/C controls, or the fan speed dial during this window.
Touching any climate control interface while the system is sweeping can interrupt the calibration cycle, causing the actuator to overshoot its physical stops and strip its delicate plastic gears.
How to flush a clogged Silverado heater core safely
You can flush a clogged Chevy Silverado heater core safely by disconnecting the heater hoses at the firewall and running low-pressure water backward through the outlet port.
This process, known as back-flushing, forces trapped debris, scale, and sludge out of the inlet port, restoring hot coolant flow to your cabin without damaging the cooling system.
Over time, GM’s Dex-Cool coolant can degrade if it is neglected, exposed to air, or mixed with non-compatible coolant types. According to the GM Technical Service Bulletins on Cooling Systems (2025), this degradation forms a thick, muddy sludge that directly clogs the narrow passages of the Silverado heater core.
Because replacing a Silverado heater core is a massive job—often requiring 6 to 8 hours of labor and costing between $800 and $1,500 according to the Automotive Labor Guide Estimates (2026)—a manual back-flush is the best first step to save time and money.
Step-by-Step Silverado Heater Core Back-Flush Guide
To perform this flush, you will need a garden hose, two 5-foot lengths of 5/8-inch clear vinyl tubing, a bucket, and a hose clamp screwdriver.
- Locate the Heater Hoses: Find the two rubber hoses running from the engine water pump and thermostat housing into the passenger-side firewall.
- Disconnect the Hoses: Carefully loosen the hose clamps at the firewall. Twist and pull the hoses off the heater core inlet and outlet tubes. Have a bucket ready to catch any spilling coolant.
- Attach the Flush Lines: Slip one piece of clear vinyl tubing onto the heater core’s outlet tube (this will be your flush inlet). Slip the second piece of vinyl tubing onto the heater core’s inlet tube and route it down into your empty bucket.
- Apply Low-Pressure Water: Connect your garden hose to the outlet tubing. Gently turn on the water. Do not use full household water pressure. The aluminum walls of the heater core are fragile; high pressure can easily burst them, turning a simple clog into an expensive dashboard-removal repair.
- Flush Until Clear: Watch the water flowing through the clear vinyl tubing into the bucket. You will likely see chunks of brown Dex-Cool sludge and scale exit. Continue flushing until the water runs completely clear.
- Blow Out Remaining Water: Gently blow compressed air (at less than 15 PSI) or use your mouth to blow through the tubing to clear out the tap water before reconnecting your heater hoses.
Bleeding Air Pockets After the Flush
Once you reconnect the heater hoses and top off your coolant, you must bleed the air out of the system. Air bubbles trapped in the heater core will block coolant flow, leaving you with cold air even after a successful flush.
To bleed your Silverado’s cooling system, park the truck on an incline with the front nose pointed uphill, or raise the front end with jack stands. Remove the coolant reservoir cap and turn your cabin heater to “High” with the fan on low.
Start the engine and let it idle until it reaches full operating temperature. Watch the coolant reservoir; you will see bubbles escape as the thermostat opens.
Keep topping off the Dex-Cool to the “Cold Fill” line until the bubbling stops and hot air blows consistently from your dashboard vents.
Common heater failure points by Silverado generation
Each generation of the Chevrolet Silverado has its own unique heating system vulnerabilities, ranging from mechanical slider failures to digital software glitches. Identifying your truck’s specific model year helps you skip general troubleshooting and target the exact components most likely to cause cold air in your cabin.
GMT800 (1999–2006)
If your 1999–2006 Silverado is blowing cold air, the issue is often mechanical or related to neglected fluid maintenance.
- Manual Climate Control Sliders: The physical slider cables on manual HVAC units can bend, bind, or snap, preventing the temperature door from moving.
- Blower Motor Resistors: If your fan only blows on high speed (setting 5) or does not blow at all, the blower motor resistor has likely failed.
- Clogged Heater Cores: According to GM Technical Service Bulletins on Cooling Systems (2025), GM’s Dex-Cool coolant can degrade and form a muddy sludge that directly clogs the narrow passages of the Silverado heater core when neglected or mixed with air or non-compatible coolant types. If you must replace the core, be prepared for a major job. According to Automotive Labor Guide Estimates (2026), replacing a Chevy Silverado heater core typically requires removing the entire dashboard assembly, resulting in 6 to 8 hours of labor and professional repair costs ranging from $800 to $1,500.
GMT900 (2007–2013)
The GMT900 platform introduced more complex electronic climate controls, which brought new failure points.
- Stripped Blend Door Gears: According to General GM HVAC Diagnostic Guidelines (2026), a faulty blend door actuator is the most frequent culprit for single-side or total heat loss in 1999-2014 Chevy Silverados, often triggered by stripped plastic gears inside the actuator motor.
- Driver-Side Actuator Failures: If your passenger side gets hot but the driver side stays freezing cold, the dedicated driver-side blend door actuator has failed or lost its calibration.
- Cracked Dash-Vent Housings: Brittle plastic housings in this generation can crack, allowing warm air to escape behind the dashboard instead of reaching your vents.
K2XX (2014–2018)
Modern Silverados rely heavily on computer modules and sensors to regulate cabin temperature.
- HVAC Control Module Software Glitches: The digital climate control module can lose its calibration or freeze up, requiring a hard reset (disconnecting the battery) or a dealer software reflash.
- Thermostat Housing Leaks: This generation is prone to slow coolant leaks around the plastic thermostat housing, letting air pockets enter the cooling system and starving the heater core of hot fluid.
- Vacuum Line Issues: Damaged or disconnected vacuum lines can prevent the mode doors from routing air properly, leaving you with air that blows only through the defrost vents.
| Silverado Generation | Model Years | Primary Heater Failure Points | Diagnostic Difficulty |
|---|---|---|---|
| GMT800 | 1999–2006 | Manual sliders, blower motor resistor, Dex-Cool heater core sludge | Moderate (Mechanical/Plumbing) |
| GMT900 | 2007–2013 | Stripped blend door actuator gears, dual-zone temperature discrepancies | Moderate (Electrical/Actuators) |
| K2XX | 2014–2018 | HVAC module software glitches, thermostat housing leaks, vacuum lines | High (Software/Sensors) |
How much does it cost to fix a Silverado heater?
Fixing a Chevy Silverado heater costs between $20 and $150 if you perform the repairs yourself, while professional shop repairs generally range from $150 to $1,500 depending on the failed component.
Minor issues like a stuck thermostat or a faulty blend door actuator are relatively inexpensive to resolve, whereas a complete heater core replacement is highly labor-intensive and represents the most expensive repair.
DIY vs. Professional Silverado Repair Costs
If your Chevrolet Silverado is blowing cold air, your total financial outlay depends heavily on whether you can swap the parts yourself or if you need to hire a professional mechanic.
- Blend Door Actuator: According to General GM HVAC Diagnostic Guidelines (2026), a faulty blend door actuator is the most frequent culprit for single-side or total heat loss in 1999-2014 Chevy Silverados, often triggered by stripped plastic gears inside the actuator motor. If you replace this part yourself, a new actuator costs about $30 to $80 and takes under an hour of your time. A professional repair shop will typically charge between $150 and $350, with the bulk of the cost coming from labor.
- Thermostat and Coolant Temperature Sensor: A stuck-open thermostat keeps your engine from reaching operating temperature, leaving your heater lukewarm. A DIY thermostat replacement costs $20 to $50 for the part and some fresh coolant. Having a shop replace the thermostat and the coolant temperature sensor usually runs between $150 and $300.
- Heater Core Flush: If your heater core is restricted by buildup, a professional flush costs $150 to $300. According to GM Technical Service Bulletins on Cooling Systems (2025), GM’s Dex-Cool coolant, if neglected or mixed with air or non-compatible coolant types, can degrade and form a muddy sludge that directly clogs the narrow passages of the Silverado heater core. You can perform a DIY flush at home for under $30 using a garden hose, clear vinyl tubing, and a chemical flush agent.
- Heater Core Replacement: This is the most severe scenario. According to Automotive Labor Guide Estimates (2026), replacing a Chevy Silverado heater core typically requires removing the entire dashboard assembly, resulting in 6 to 8 hours of labor and professional repair costs ranging from $800 to $1,500. While the replacement heater core part only costs $50 to $150, the DIY route is highly complex and requires patience, organization, and basic mechanical experience to safely drop the steering column and pull the dash panel.
| Repair Type | DIY Parts Cost | Est. Professional Labor Hours | Total Professional Cost |
|---|---|---|---|
| Blend Door Actuator | $30 – $80 | 1 – 2 Hours | $150 – $350 |
| Thermostat & Sensor | $20 – $50 | 1 – 1.5 Hours | $150 – $300 |
| Heater Core Flush | $15 – $30 | 1 – 2 Hours | $150 – $300 |
| Heater Core Replacement | $50 – $150 | 6 – 8 Hours | $800 – $1,500 |
Frequently Asked Questions
Why is my Chevy Silverado blowing cold air when the heat is on?
Your Chevy Silverado blows cold air when the heat is on because hot engine coolant is not reaching the heater core, or a broken blend door actuator is blocking hot air from entering the cabin.
This is typically caused by low coolant levels, a stuck-open thermostat, a clogged heater core, or stripped gears inside the actuator motor.
How do you reset the blend door actuator on a Chevy Silverado?
You can reset the blend door actuator on a Chevy Silverado by pulling the HVAC fuses from the fuse block, waiting one minute, and then cycling the ignition. To do this, turn the ignition off, pull the HVAC/ECAS fuse, wait 60 seconds, reinsert the fuse, and start the truck without touching the climate controls for two minutes to let it self-calibrate.
How do I know if my Silverado heater core is clogged?
You can tell if your Silverado heater core is clogged by performing a touch test on the two heater hoses running through the firewall in the engine bay. If one hose feels hot while the other is cold or lukewarm when the engine is fully warmed up, coolant is blocked from circulating.
Other signs include a sweet maple syrup smell inside the cab or film on the windshield.
How much does it cost to replace a heater actuator in a Silverado?
Replacing a heater blend door actuator in a Chevy Silverado typically costs between $150 and $350, depending on whether you do it yourself or hire a professional. The part itself costs around $30 to $80, while professional labor adds another $100 to $250.
Can I drive my Silverado with a clogged heater core?
Yes, you can safely drive your Silverado with a clogged heater core, but you will not have cabin heat or windshield defrosting capabilities. However, if the clog is accompanied by a coolant leak, you risk overheating your engine, which can cause severe damage if left unaddressed.
Where is the heater blend door actuator located on a Silverado?
The main heater blend door actuator on a Chevy Silverado is located under the passenger side of the dashboard, mounted directly to the HVAC plastic housing near the center console.
Depending on your model year and whether you have dual-zone climate control, there may be additional actuators located behind the glovebox or deep under the driver’s side dash.